
Hello. I have relocated my blog to tumblr. Stop on by!
http://gregoryreynolds.tumblr.com/
9.03.2011
8.16.2011

8.13.2011

8.09.2011

8.08.2011
8.07.2011

8.04.2011

8.03.2011

6.19.2011


6.15.2011
fast forward

last night we primed the inside of the hull and tonight we painted the inside grand banks beige and the rails sea green. they both need a second coat but it looks pretty already. install on sunday i hope.
6.14.2011
calling in sick
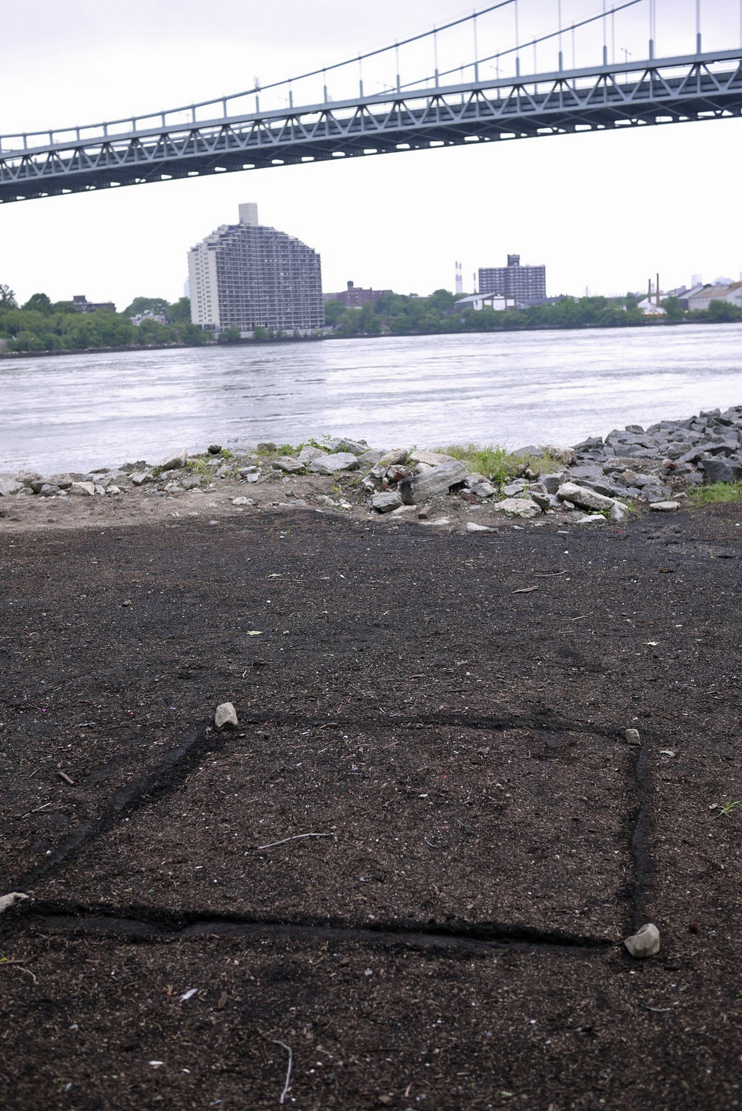
i want a hole here. across the east river you can see Queen's and the RFK (triboro) bridge. looking from Randall's Island. today i called in sick so i could be on site to receive a concrete delivery.

yesterday the park was kind enough to dig the hole for the base of my boat with a backhoe.
excellent although i realized today at the last minute that it was 10" too shallow. this made for some furious digging for the hour before the truck came with the concrete. 6' x 6' x 10" is a lot of dirt to fling out of a four and a half foot deep hole. in case you were wondering. 25 cubic feet or so. also, i did a lot of digging too not just pablo. pablo is the best.

the truck came early and featured a real grumpy large stogie chewing stereotype. he was none too patient but i swear the hole had 5-6000 pounds of concrete in it and he was rolling out of there in about 2 minutes. if i wasn't scared of him i would have taken his picture.

and i dunno, it doesn't seem quite right to blab about the hole and the concrete without showing said concrete. pretty fascinating i know. after this we drove all the way to jersey city and sanded the rails and sole of the boat for about an hour. we then primed the entire inside of the hull and the rails. i was in a total rush by the end of painting and didn't snap a photo though. get over it.
i will tomorrow.
6.11.2011
the baseline

well this was terrifying. yesterday 6 of us stood the boat up onto it's steel baseplate. with the steel rails attached the boat weighs about 275 lbs most of which was above our heads as the boat got more vertical. add to this the point of the bow was sliding on the steel plate we were trying to stand it on. but as it often goes, it was fine. darren was scrambling around on the second floor lassoing a cargo strap around the hull and attached it to one of the 3000 lb steel tables he has all over the place.

next, an upright steel plate was welded to the baseplate. the upright plate was also bolted through the keel. if you zoom in on this picture you can just see the bolts. as we place everything, zach was instantly welding away and the whole process took less than 45 minutes.

with the baseplate added the boat is about 650 lbs. which is kind of ridiculous.

and here it is. this is so strong it is rather unbelievable. the channel steel is welded to the baseplate, the upright and the steel rails. the tip of the bow is also welded to the base. i still feel pretty worried about it overall, but now that the baseplate is on, the boat as a whole is as strong as i can make it. really the only thing left to worry about is the installation on site. this week i will clean it all up and paint it real nice.
6.09.2011
forces at play

ok so today i finished putting the steel rails on. it was stressful (pun intended). as i mentioned before i needed to re-shape these rails so they would match the contours of the boat. we got them pretty close but not perfect, so they had to be flexed as i put in bolts. as you can imagine 2" x 3/8 steel bars become harder to bend the shorter they become which resulted in the bow cracking away from the stem right at the top. sooo...

i had one of darren's welders weld in a brace in front of the bow to stop the rails from torquing the bow apart. phew. i have to do this at the back of the boat too. for tonight the stern is being squished by a big bar clamp. nooo problem, i will just keep making it up as i go along until i am done or whatnot.
did i mention that the wood and fiberglas were nearly on fire while being welded? because they were.
6.08.2011
the third rail

three things (well actually four except i forgot to take a picture of the finished keel).
the first you can see is that i installed and sealed the sole.
the second is that i made the transom seat. to build it i made a pattern the same shape as the back of the boat. then i cut it out to match the pattern. then i epoxied and clamped together 5 mahogany planks. finally i bevelled the side edges to match the angle of the hull (which changes quite a bit from front to back)

but wait! remember the rails? well this is the third time i have installed them. tomorrow i hope they will be finished.
i now know what model railroaders experience. which is partly why i am inflicting it on you.
6.05.2011
strongback

so here are the updates from the boat sculpture project that has hijacked my blog.
yesterday pablo and i put the first coat of primer on the hull. needless to say it has changed things considerably

then today we put on the keel aka "strongback". it was a bit of an epic because we had to lay out epoxy along the hull where the keel sits and then once we placed it, it had to be bolted down before the epoxy started to set.

and to make it more interesting the guy who originally made the boat, broke the keel while making it.
so we had to fix it while attaching it. i know, right? get over it.
6.02.2011
learning curves


this only took about 13 hours! but for the first time in 2 weeks i feel like my list of things to do got significantly shorter.
5.31.2011
the veiling

aka-fiberglassing the hull round one.
5.30.2011
weekend update

this machine bends steel bars. they need "sheer", the vertical dip in the hull from bow to stern, and sideways curve to form the widest point at the beam to the narrowest at the bow and stern.


but... there are some cracks in the cedar strip hull. so i have decided to fiberglas it. a guy is coming tomorrow.
this is getting out of hand.
it will be pretty amazingly strong i think once all this is done. for real. gimme strength.
5.21.2011
the uprising

next we will figure out the exact angle i want it to sit at and we can start the footing.
Oh, and the board with holes in it, represents the amount of the bow that will be underground.
standing on the ladder, darren is demonstrating someone standing at ground level.
5.19.2011
night vision

darren's impulse drawings during our brainstorming session.
my friends rob and pablo along with darren made for a most productive time.
thanks my dudes
rob has a few photos on his weblog too
Subscribe to:
Posts (Atom)